


 7/25/2010 07:01:00 PM
 Unknown


About this Post
Instructions
Download
Free Alerts,Follow us
Comment on this

The post describes how to install Oracle Enterprise Linux (OEL) and Red Hat Enterprise Linux (RHEL) in step-by-step procedure with screenshots. The procedure is based on Graphical mode. Even the text mode is also similar but there is no mouse, you have to use only Keyboard.
Here I used Oracle Enterprise Linux 5 (OEL 5), the same steps can be apply to:
Oracle Enterprise Linux 4 (OEL 4),
Redhat Enterprise Linux 4 (RHEL 4),
Redhat Enterprise Linux 5 (RHEL 5)
No need of considering the Versions 4, 5 etc..., almost all versions have same steps.

If you feel the following images are not visible, then click on them to see in large.
1. Insert the OS CD/DVD into your system and restart, after that you will get the screen as shown below. Press Enter to continue installation in Graphical mode.

2. Next you will get the screen saying " CD found", then press "TAB" to move the cursor to the "SKIP" and press "ENTER".

3. On the Welcome Screen, Click "NEXT"

4. Next you will get the language selection, Select the Language that applies you and Click NEXT.

5. Select the KEYBOARD layout setting and click NEXT.

6. Click YES on the Disk portioning Dialog.

7. Select Type of Installation: Personal Desktop, Workstation, Server, Custom and click NEXT.

8. Then, Disk portioning setup will appear. Select : "Manually Partition with Disk Druid" and click NEXT.

9. After Clicking NEXT in above step, You will get a Warning. Then click YES.

10. By clicking YES, You will get the Hard-Disk spaces as show below. If any unnecessary partitions delete that by selecting.
Look the below info and use it in Steps 11,12 ,13.
Root : As per your requirement. (Above 30GB for home use, 50 GB is preferred ).
Boot : 500MB- 1GB.
Swap : Double the size of your RAM. (If your RAM is 2GB give 4GB for Swap)
11. Select the FREE SPACE and click on NEW. In the Mount Point select ' / ' i.e; ROOT. Allocate the Size to the Root in MB and click OK.

12. Again select FREE SPACE and click NEW. Now in Mount Point selecct '/boot' . Allocate the size, 500MB-1GB is enough and click OK.

13. Now again select FREE SPACE and click NEW. Now leave the MOUNT POINT and in FILE SYSTEM TYPE select SWAP and allocate the size. Size is atleast double the size of your RAM and click OK.

14.After completing, you will get a final view of your partitions as shown below:

15. Now you will get the BOOT loader settings, Just click NEXT.

16.Configure the Network interface settings, If you dont know just click NEXT.

17. If you dont use DHCP, enter appropriate IP address and Subnet Mask Address.

18. Also fill the Host address, Gateway,DNS fields.

19.Select the relevant region by clicking your country on the map.

20. Select relevant City by clicking on the Map and click NEXT.

21. Now you will get the Root Password field, Enter your desired Password and click NEXT.

22. Now you will get the Package selection. Select "Customize now" and click next.

23. Now you will get the list of packages, select the packages you want. if you want all select all packages and click NEXT.

24. Now you will get a screen About the Install, as below, click "NEXT" to continue.

25. If you are using CD package you will get an alert as shown below, Click on "CONTINUE" to proceed. If you are using a DVD then you will not get this screen.

26. Now the installation starts. If you are using a pack of CDs it will alert you to put the appropriate CD during the installation. Then place that CD. DVD users have no problem of changing Discs.

27. After Installation, you will get the message " Congratulations the installation is Complete" .Click on "REBOOT".

28. After Reboot, you will get a WELCOME screen , Click on "FORWARD".

29. Accept the License agreement and click "FORWARD".

30. On the Firewall Settings, click disabled.
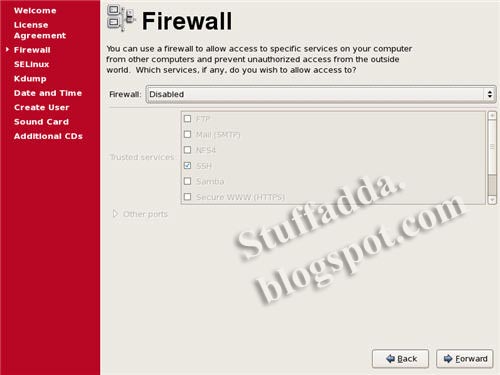
31. By Disabling Firewall, you will get a warning Click on YES to continue.

32. On SELINUX configuration, Disable it.

33. You will get a Warning on SELINUX, Click YES to continue.

34. If you get KDUMP, leave its Default settings and proceed by clicking "FORWARD".

35. Now adjust the Time settings, if required.

36. If you have a Red Hat Network account, you can enter it here and register your system. Alternatively, you can pick the "No, I prefer to register at a later time" option and click the "Forward" button to avoid this step.
37. Create an additional User if required. If you dont want Click FORWARD.

38. If you don't create an user in the above step, you will get an alert, Click on CONTINUE.

39. On the Sound Card screen, click FORWARD.

40. On the additional CDs click FINISH.

41. You will get an alert of rebooting, Select OK.

42. Now your system reboots, after starting you will get a welcome screen as below:
Enter the Login credentials. If you are logging as ROOT, enter ROOT in the username and password you created in the Step 21.

43. After logging in, you will get a Desktop. Like as shown below:

Hope you installed successfully, If not write your comment below. If you like this info make your comment.
Get Free Alerts:
Tags: Oracle Enterprise Linux 4 5 OEL 4 OEL 5 Installation guide, Installation Steps, Redhat Enterprise Linux 4 5 RHEL 4, RHEL 5, RHEL 6 Installation guide, Installation steps, screenshots, Images, Installation help.
© stuffadda.blogspot.com|stuffcenter.co.cc|stuffcentre.co.cc
 Posted in:


0 comments:
Post a Comment